votesUP Manual
You want to use votesUP with your organisation? Below we have put together a guide that explains the most important things.
Contents
0. Preparations
1. Create a new event
2. Overview of the management panel
3. Participants and user roles
4. Accounts for participants: token, email or spontaneous (without registration)?
5. Authentication: is it really you?
6. Conduct open votings and secret ballots
7. Digital “absentee ballot”
8. Proxy Voting: Transfer of voting rights
9. Election board / observers
10. Minutes
11. Agenda
12. Speakers' lists and points of order
13. Presentation
14. Brainstorming
15. Focus on the essentials: the action mode
16. Messages / Chat
17. Profile
18. General settings
19. Legal information and privacy policy
20. Data Processing Agreement
21. Close, reset or delete an event
22. Long-term archiving of results
23. Large events
24. What can go wrong? (or: frequently asked questions)
0. Preparations
All you need to get started with votesUP is an Internet-enabled device with a browser that is modestly up-to-date. It's up to you whether you prefer Mozilla Firefox, Microsoft Edge, Apple Safari, Samsung Internet, Google Chrome, Vivaldi, Brave, Opera… The only choice you should avoid is the very outdated Microsoft Internet Explorer. Also in terms of devices you can choose according to your preference: votesUP can be used on a smartphone, a tablet and a desktop computer. Yet if you intend to host and manage an event, we would recommend a sufficiently large screen.
The icons and buttons in votesUP may look slightly different depending on your device, as votesUP uses standard icons. This allows us to save bandwidth, so that votesUP can also be used in places with poor internet connection or in busy wifi networks.
⚠️ Within one browser session only one person at a time can be logged in, i.e. either the host or a regular participant. For test runs with different roles etc. it is easiest to use two different browsers on one device.
1. Create a new event
The first thing you need to do is create an 'event'. The most important step is to define an “Event-ID”. This ID will be the general access code for the event. (In addition, your participants will also have to identify themselves personally, but more on that later.)
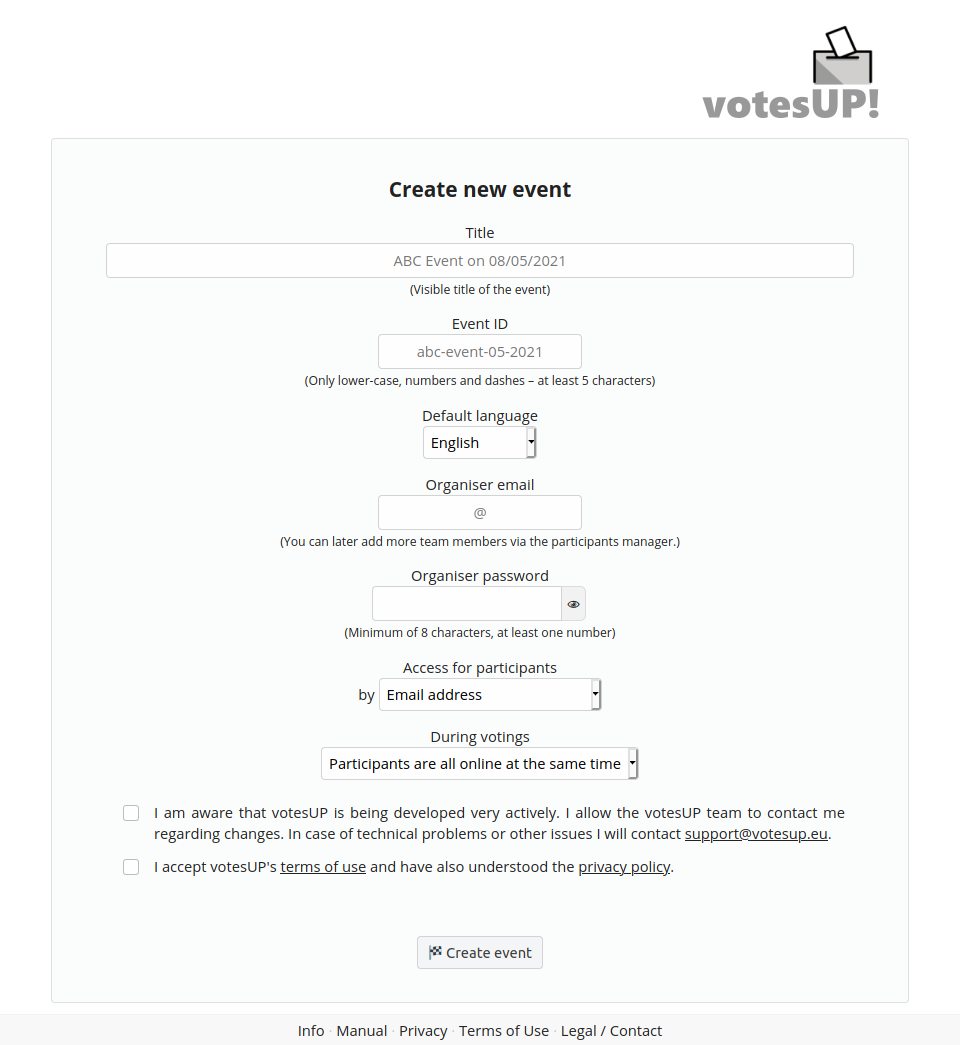
Any other settings for the event can be changed later, so don't worry about them now. More importantly, make sure you enter a valid email address for the organiser. You will receive an email with a confirmation link in a few moments. As long as the event has not been confirmed by you, some of votesUP's features will be restricted: the most obvious is the limit of five additional participants. In addition, unconfirmed events are automatically deleted after three days.
A QR code is generated in conjunction with the event, allowing participants with smartphones or tablets to conveniently access the event. The QR code can also be retrieved at any time later on. It can be found in both the event settings and the personal profile.
⭐️ Pro tip: Two types of QR codes to choose from
votesUP offers two different types of QR codes, depending what fits for your use case: There is a “general” QR code for each event. This only contains the internet address of votesUP together with the event ID and can be printed on widely distributed invitations or projected onto a screen. This general QR code can be accessed at any time via the profile page or the event settings.
Alternatively, in the participant manager you can create a full list of personalised QR codes for token-based accounts (i.e. when participants authenticate without an email address). These QR codes provide the comfort for participants to not having to type their access tokens by hand. Accordingly, the personalised QR codes contain the internet address, the event ID and the personal token. They are only intended for a specific participant and should not be passed on. In section 4. (below) you will find a description of how you can send personalised tokens in mail merge/mass mailings.
2. Overview of the management panel
Once an event has been created, you will get access to its management panel. You will see two navigation menus. The upper button bar is visible to your participants, while the second bar is only available for you as the organiser. This approach allows you to always check how the participants are experiencing the event.

For a better overview on smaller screens, votesUP reduces the size of the menus by omitting labels. On smartphones, in particular, you may only see the icons.
In case the features «Agenda» or «Speakers' List» have been deactivated in the event settings, they will no longer appear in the navigation menu for regular participants.
In the main area of the window, you will see the functions for executing the most important task of votesUP - conducting votes. You can either prepare votes in advance or carry them out spontaneously. The only important thing is that you will need participants who are entitled to vote. Please note that an organiser will not be able to vote!
votesUP indicates (to everyone) which point of the agenda is currently active. To you as the organiser, it also informs you if there is any self-registrant in the waiting room. This information is updated every time you open a new page or execute a function. Of course, you can also switch to the participant management at any time and check the status directly.
3. Participants and user roles
Attendees can be added to the event in two ways: Either you edit the accounts in advance, or you allow participants to self-register. The latter is the default. Self-registrants will be taken to a waiting room until they are granted full access.
In order for participants to “locate” your event, you must provide them the event ID that you have assigned when creating the event. Participants will need to enter the event ID on the votesup.eu homepage and then identify themselves in the second step. There are two variants here: the personal email address or predefined tokens. The difference will be explained a bit further below.
You can even make the access to your event a little easier, especially if you use votesUP in parallel with a video conference or the invitation was sent electronically (email, messenger). The event ID can be appended to the votesUP address with a leading question mark, so that participants do not have to enter the event ID manually. The direct link is structured as follows: https://votesup.eu?event-id. You can also find the access link at any time later in the event settings and on your personal profile page. The QR code cam also be used to conveniently transfer access to your smartphone or tablet without typing.
In the participants manager, all user accounts for this event are listed with their roles and, if applicable, their voting weight. Additional participants can be added here at any time, and self-registrants can be admitted for participation.
A participant can be assigned one out of several roles in votesUP. Your role as host of an event will be displayed as »ORGANISER«. The most important other roles are »VOTER« and »GUEST«. You may also attribute the ORGANISER status to additional users, so that you can comfortably host an event as a team. But please be aware that ORGANISER accounts cannot be entitled to vote.
As already mentioned, depending on the configuration of the event, participants can register themselves or are registered in advance by the organiser team. For self-registrants, in the default setting they will find themselves in a waiting room, in which they can interact to a certain extent with other waiting persons and the hosts. They cannot see participants who have already been admitted, but they will be able to receive messages from them. After self-registrants have been assigned a role by the organisers, they will be able to access further functions in votesUP.
Participants generally have access to the overview of all participants. However, due to data protection and security considerations, there are certain restrictions in place: Other voters or guests do not see pre-registered tokens or email-based accounts that have never been active. Besides, they will never have access to the email addresses of other participants, but only to their display names. This display name is first generated automatically from the email address of the self-registrant. votesUP tries to recognise what would be a good display name. For example, firstname.lastname@example.com becomes "Firstname Lastname". info@example.com becomes "Example (Info)", etc. Participants can alter their display names at their profile page.
Organisers may also customise participants' display names. And they can also help if an email address contains a typo or if participants want to deactivate two-factor authentication.
Roles can also be changed subsequently via the participant manager. votesUP enables this in a step by step manner – a person currently entitled to vote must first be blocked before he or she could possibly be deleted altogether. If there was already a vote with that person entitled, blocking is as far as you can go. When the role is changed to guest, persons who were already entitled to vote in prior ballots are displayed as “former voter" Anyone who has already been entitled in a vote cannot be changed to an organiser role – this is only possible if all votings in the event are being reset.
4. Access for participants: token, email or spontaneous (without registration)?
votesUP offers three different ways to register participants for an event. The default is “email address”. This can be changed in the event settings to "neutral tokens" or a mixed form. This option will change the login screen for your attendees. Email accounts will still be able to log in, but the option for token users will be added.
As a third option, votesUP offers the possibility of spontaneous participation, i.e. without authentication. Participants only need the event ID to log in as eligible voters in the event. Depending on the use case, hosts can require participants to enter their name or allow them to participate anonymously. Without a name, participants are given a random token ID. Spontaneous participation may be suitable for less binding votes or for the expression of general opinions. Participants will not be able to login to the event again with the same token.
Token accounts are a good choice if you do not know the participants in advance or your participants have no or only limited access to an email address.
These access tokens can be generated automatically by votesUP. The corresponding function can be found in the participants manager. Depending on your security requirements, you can configure how many characters the tokens should have. The default token length is eight characters. There is no difference between upper and lower case letters.
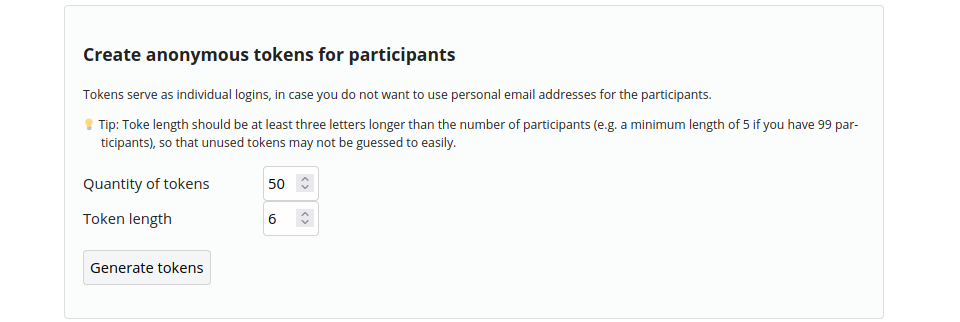
The tokens are only anonymous as long as they are distributed anonymously (e.g. when each participant takes a printed token from a basket).
You can also use tokens as regular access with "real" display names. Depending on your event settings, attendees may be prompted for their name when they first log in. Alternatively, attendees can change their display name from their profile page. If anonymity is important, the organiser should disable the option to change display names in the event settings. However, names that have already been changed will remain as they are.
In mixed mode, both email accounts and token accounts can log on to your event.
A special feature is the “passwordless tokens” mode, which does not require passwords. Please note, however, that once a token has been used, it will be associated with that mode: tokens with a password cannot subsequently: tokens with passwords cannot subsequently “lose” their password; passwordless tokens, on the other hand, cannot be subsequently transferred to the mixed mode.
A list of personalised QR codes can be displayed for all prepared tokens. Scanning the QR codes can significantly lower the barrier to participation, especially with smartphones and tablets: participants only need to enter their password, as the event ID and token are already contained in the QR code.
⚠️ In contrast to the other login methods, with passwordless tokens only a one-time login is possible – anyone who logs out of votesUP will not be able to return.
⭐️ Pro tip: Office mail merge with personalised QR codes
You can also generate personalised QR-Codes for votesUP together with the mail merge feature in Microsoft Office. To do this, export the list of participants from votesUP as a CSV file. You can open this in MS Excel (caution: consider import with UTF-8 coding if umlauts or non-Western European characters occur) and the file becomes the data source for MS Word.
You can then create QR codes in MS Word. The personalised QR codes for votesUP are structured according to the following scheme: https://votesup.eu?<EVENT-ID>%2C<TOKEN>. What you need to to is to replace <EVENT-ID> with your event-ID and, during mail merge, replace the field <TOKEN> with the correct token for each participant.
How to achieve that: Edit the mail merge document in MS Word, press the ALT and F9 keys simultaneously at the desired position. In the curly brackets that now appear, write DisplayBarcode "https://votesup.eu?<EVENT-ID>%2C" QR and place the mail merge field of the tokens directly in front of the second inverted commas.
For pre-registered participants with an email address, votesUP offers the option of sending personalised invitation emails automatically. In addition to a short introductory text, these emails contain a direct link for the person concerned, so that they no longer have to enter the event ID and their email address themselves: only their password needs to be entered manually.
Invitation emails can be sent to each account individually or to all attendees who have not yet received an invitation. The language of the email will follow the personal settings for each person. As the invitations are sent in batches and with a time delay, it may take up to an hour for all emails to be sent for larger events. For testing purposes, event organisers can also send invitation emails just to themselves.
If the personalised invitation mail got lost in the participant's inbox, another invitation can be triggered by the organiser after a minimum of two hours (via the individual accounts editor in the participation manager). The reason behind that is that votesUP wants to prevent the risk of people being bothered without their consent.
If votesUP encounters problems with a registered email address, votesUP will indicate this in the participant's individual configuration. Among other things, votesUP evaluates email bounces of the last few days and an internal list of obviously wrong domains. Even if votesUP does not show any problems with a participant's email address, the system may not be aware of other existing problems (e.g. full mailboxes).
5. Authentication: is it really you?
As an event organiser, you want to be sure that each account is being used by the right person. However, not every event has the same level of authentication requirements. That is why votesUP offers different security levels that you can choose from, depending on the needs of your event.
The best level of security can be achieved if only you as the organiser upload the email addresses of all participants and then activate two-factor authentication (2FA) for everyone. 2FA means that a user has to enter an additional one-time security code to log in. The code is emailed to them at the moment they attempt to log in. 2FA ensures that each participant is the person they say they are at the time they log in, i.e. when they set their access password for the first time.
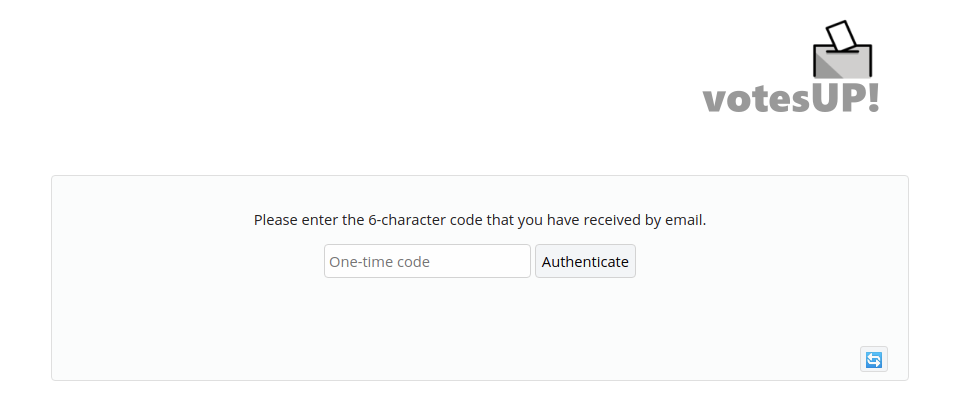
Two-factor-authentication in votesUP
One level of security lower is the general option “Send a verification link by email upon first registration”. You can enable this automatic sending in the event settings. However, unlike two-factor authentication, these verification links are not a real barrier, but rather a way for you as an organiser to see the status of each attendee: The participant manager shows a darkened person icon (👤) in case an email address has been confirmed. A lighter icon means that the email address has not yet been verified by means of a confirmation link. Participants can also request this verification link themselves on their profile page.
For token accounts, the darker person icons indicate a token that has been activated, while a lighter icon indicates the token has not yet been used. "Activated" means that someone has logged into the account at least once and a password has been set.
The mode for spontaneous participation is not recommended for legally secure voting.
6. Conducting open votings and secret ballots
Note: votesUP does not make a conceptual distinction between “votings“ and “elections“.
Votings can either be prepared in advance or created spontaneously as needed. Prepared votings can be changed later, e.g. if a previously unknown candidate is added. As soon as a vote is in progress, it is of course no longer possible to change it.
votesUP is designed for typical conference settings, in which spontaneous votes often need to take place. Therefore, simple yes-no-abstentions-votings are possible without any preparation. The default question is «Do you agree?» with the three options offered. With «Start voting instantly» a member of the organising team can start the voting process without delay. Multiple votings can be open at the same time.
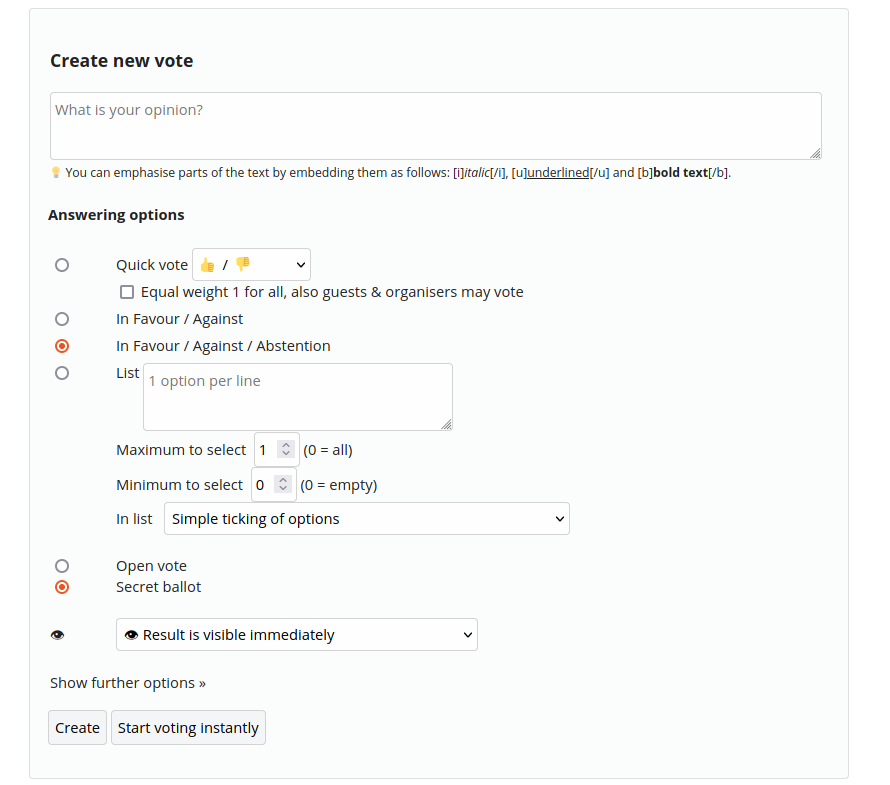
Voting question
The voting question can contain up to 15,000 characters, which corresponds to 8–10 A4 pages. So the “question“ can also be used to vote on entire text proposals. votesUP automatically changes the layout for texts with more than 500 characters to ensure good readability even for longer sections.
You have a number of formatting options to emphasise parts of the text. To do this, you have to enclose the respective words or parts of text parts with small codes, e.g. [i]…[/i] for italics, [u]…[/u] for underlined and [b]…[/b] for bold text. Further options are [s]strikethrough[/s], [sup]superscript[/sup] and [sub]subscript[/sub]. Line breaks in the text are also possible. To check the appearance (once you have put together a ballot) click on «Preview».
It is possible to add a photo/image to the ballot paper. This can be used, for example, to present candidates or to vote on new logos. The feature can be accessed under "More options". Free events can create a maximum of one such ballot; there are no restrictions for paid or affiliate events.
Answering options
votesUP offers different types of voting. These can be selected in the section “answering options” when preparing a poll.
- In favour / Against / Abstain
- In favour / Against
- List: If there are several candidatures to choose from, or if you need answering options other than “In favour/Against/Abstain”, you can create a list of voting options. By default, a simple checkbox is being presented per entry/candidate, but you can also enable a yes/no/abstain per candidate/option, as well as the option to accept/reject whole lists, or a general abstention. When creating the ballot paper it is important that you think about the minimum and maximum number of list options that have to be selected, so that the voting results will be valid.
- Quick Vote: The process for these polls differs slightly from the other votings because they are more visual and do not require a confirmation click from the participants. In addition, there is the possibility to extend the group voters to include the guests and the organisers, so that all participants can express their opinion equally. There are three styles of quick votes to choose from: 👍 / 👎 (good - bad), 🙂 / 🙁 / 🤔 (happy - not happy - thinking) und 🙂 / 😴 / ☕️ (happy - exhausted - need break)
Open and secret ballots can be conducted. votesUP ensures the secrecy of the vote by processing secret ballots differently than the open ones: In secret mode, voters are merely ticked off in the voter list and the ballots are processed separately, so that even on a technical level there is no possibility of mapping the votes cast to individual voters.
Who is allowed to vote?
votesUP is pre-configured for legally secure voting. This means that in the default setting all eligible voters must already be determined when a voting starts. In live/conference mode, the predefined rules are the strictest: Only those who are eligible to vote and were online in votesUP at the time of the start of a specific voting, will be eligible to cast their vote. This strict ruleset ensures that the electoral board can always verify the quorum.
In the default mode it is not possible for individuals to log in later or that an organiser assigns voting rights for an ongoing vote. In such cases, the voting needs to be repeated.
If a voting is intended to run e.g. for a whole week, votesUP offers a form of digital absentee voting, which will be explained in the next section. In such occasions, the eligible voters must be registered beforehand but may go online during the entire voting period.
If the number of eligible voters is not yet determined at the start of a voting, votesUP offers an alternative to the legally secure mode that allows additional voters to be added while the vote is in progress. This provides the flexibility to add eligible voters at a later stage or to give them additional voting weight. This mode is also very useful for completely open polls where the group of participants is not fixed at the beginning.
The alternative to the legally secure mode does not automatically mean that a voting would not be valid. Since the statutes of organisations as well as the legal framework differ in various countries, votesUP uses the strictest definitions by default.
Splitting the votes
By default, participants with a higher voting weight cannot split their votes. When they cast their vote, it is counted as many times as their voting weight indicates. However, the organising team has the option to allow vote splitting. This option can be found in the event settings and applies to all upcoming votings.
Preparation of votings
For larger events, it is probably worthwhile to create certain votings in advance, especially for more complex ballots or when it comes to candidate lists. Created votings can be checked at any time with the “preview” option. Modifications or additions to the prepared votings are also possible.
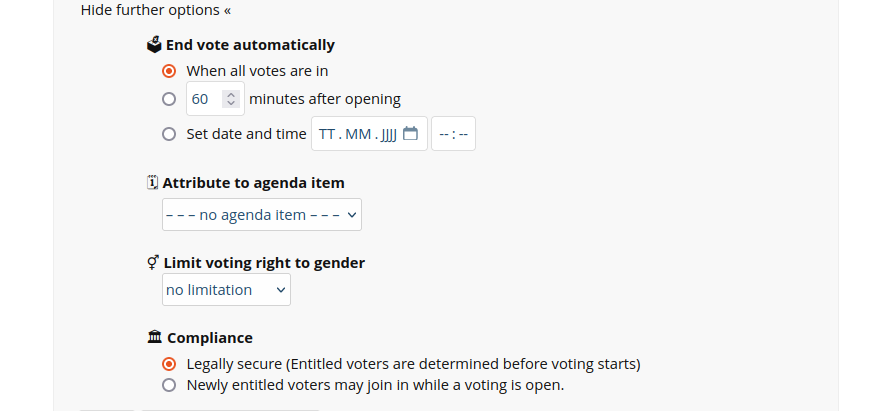
If you are preparing a large number of votings, it can be difficult to keep track of them on a smaller display. Therefore, votings can be assigned to specific agenda items. They then appear in the preparation list sorted by agenda item.
Depending on what participants are currently doing in the system, they either see the voting automatically or have to click on the home/voting box button in the menu bar. TThe button will start pulsing within 30 seconds to indicate that a voting is in progress. To prevent participants from accidentally clicking in haste, they must first select their voting preference and then click on “Vote” on the ballot.
⚠️ Keyboard operation can also be used for participation, as access keys are associated with the respective options: j für Ja, n für nein, e für Enthaltung, a für Absenden. When choosing in lists of candidates, the individual entries can be reached with the numbers 1–9.
The submission of an invalid ballot is prevented by votesUP. However, participants can also choose not to cast a vote in a specific poll. The event host determines when to close a voting or election process. Yet votesUP also automatically closes votings when all votes have been received.
In the default setting, all approved participants, including guests, have immediate access to the voting results after the end of a vote. This includes the list of eligible voters and, in the case of open voting, the specific individual votes as well. The transparency level can be reduced at any moment in the event, up to the point where only the organising team can see the results. In addition, there is an option to prevent automatic visibility of the results for individual votings. Either you select “organisers can review the results first” or the next level, “results must be unlocked”. The results will then remain secret (even for the organising team) until explicitly unlocked. This level is especially suitable when multiple elections are to take place consecutively as a group, without allowing one election result to affect the next votings.
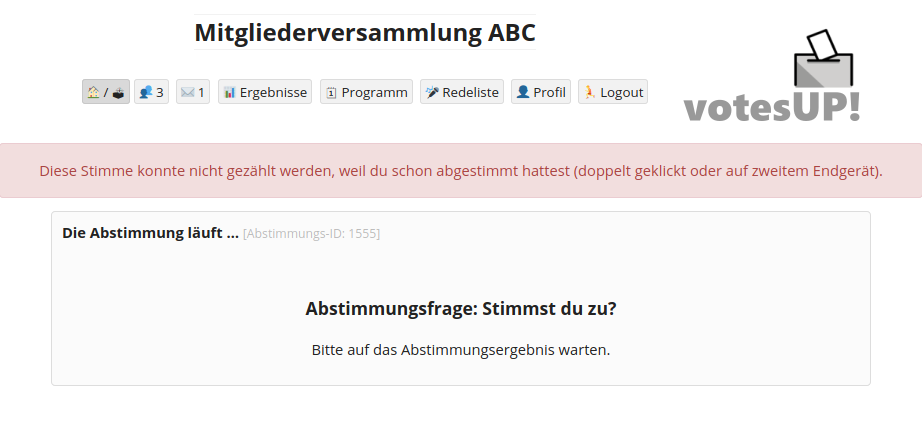
votesUP prevents attempts to cast a vote several times: a participant my be logged in on multiple devices, but voting can only be cast once. Attempts to participate in a vote multiple times will be rejected by the system.
When an event is confirmed (= confirmed mail address of main organiser), all voting results can be sent via email to that email address. The email contains all aggregated results, but no information about individual votes.
7. Digital “absentee ballot”
If you want to run the voting over several days, you can change the event mode to “digital absentee voting”. Eligible voters no longer need to be online at the start of a poll. However, However, they still need to be assigned voting rights before the voting starts (if you are using the default mode for binding votes).

This mode can be set either directly when creating the event or later in the event settings. In the participant list this mode is visible to everyone: The display changes from »🗳 Entitled voters present« to »🗳 Entitled voters altogether«.
For comparison: In the default setting, votesUP would assume a live event, i.e. all participants are online at the same time. Only eligible voters that are currently online when a voting is opened may actually cast their votes. A log-in during the ongoing voting does not entitle the participant to vote. The reason for the default live setting is that the number of eligible voters does not change during an ongoing voting, which could lead to confusion.
Pro tip: Within an event, it is possible to run votings with different voting rights in parallel (in absentee mode). When opening a voting, votesUP saves the current list of eligible voters for that vote. It remains unchanged. Therefore, new voting rights can be assigned through participant management if another vote needs to be opened - this change does not affect the ongoing vote.
Votings may be attributed with an individual expiry date. It is possible to enter a specific date and time as well as a relative expiry time. The latter means a number of minutes from the opening of the voting until its automatic closing.

The time zone of votesUP is Berlin/Central Europe. Deadlines are following that time zone. Voters see the deadline on their ballot paper. Late voting is not possible. However, it is possible for the organisers to extend the voting period even when the voting is already ongoing.
Voting will be closed automatically as soon as all eligible voters have cast their votes or when the voting period ends–whichever comes first. If no one from the organising team is online at that particular moment, votesUP will inform the main organiser by email.
8. Proxy Voting: Delegation or transfer of voting rights
As the organiser, you can allow eligible voters to delegate or transfer their voting rights to other participants. This function is inactive when the event is created and must be explicitly activated via the event settings.
Entitled voters may then choose to transfer their voting rights to another person (guest, voters or former eligible voters) via their profile page. The invited person has to actively accept such invitation for the transfer to be valid. The acceptance cannot take place during an ongoing vote.
Voters with a voting weight over 1 can decide how many votes they want to delegate. They can also divide the delegation of voting rights among several persons according to their voting weight.
The person who took over the voting rights may return the voting rights at any time if the person originally entitled to vote is currently online and no voting is taking place.
The person originally entitled to vote can reclaim their voting rights at any time. If the person who had taken over the voting rights by proxy has already sub-delegated the voting rights, they need to retrieve those first.
Whenever voting rights are transferred, the main organiser's account receives a notification. The transfer is also automatically recorded in the minutes.
Apart from this function, the organsing team can adjust voting rights of all participants at any time.
9. Election board / observers
In order to observe or conduct votes or elections, many organisations appoint election supervisor(s). These are often not the same people who organise the votesUP event. For this reason, guests or eligible voters can be assigned the additional role of 'Election Committee / Election Observer' via the participant manager.
In concrete terms, the assignment of such role means that the observer has the possibility to check the quorum and gender distribution in the event and that they can already see results once the vote ended, even if they are still set to invisible for other participants. Furthermore, election observers may also check the list of eligible voters for a specific vote, before the list becomes public.
The observer role is designed to be "passive", as only the organisers of an votesUP event can start or end votings or unlock results. However, if an election supervisor triggers the 'Check Quorum' function, the result of the counting will automatically be recorded in the minutes (with timestamp).
10. Minutes
votesUP automatically keeps minutes of the event, based on the activities. Not all activities are recorded – for example, the preparatory uploading of participant lists or the creation of tokens are not relevant for the minutes. However, role changes (assignment or revocation of voting rights) for existing participants are documented.
Unneeded entries in the minutes, such as those that may have arisen from test runs, can be made invisible. The minutes can generally only be viewed by members of the organising team, as they may also contain personal data in the case of user logouts.
If you want to record which participants are present at a certain point of the event, you can trigger an automatic documentation list by using the corresponding button.
11. Agenda
The programme or agenda of an event can be visualised in votesUP. When an item on the agenda has been activated by the organiser, it will be visible to all attendees as a bright blue banner between the navigation menu and the page content.
Agenda items can be numbered or have an alphabetical order. votesUP will follow this sequence, so that, for example, a subsequently inserted point 4.2 would automatically be sorted between 4.1 and 5. If agenda items go beyond 1.-9., you should enter the single-digit ones with a preceding space - this ensures correct sorting.
In addition to or instead of numbering, it is also possible to specify times. The organiser determines whether the agenda items are sorted by time or by number.
Each agenda item can be supplemented with an explanatory details that will appear in the agenda overview page and in a slightly smaller font. These detail sections can be used to explain procedural information or link documents.
Formatting options are available to highlight text sections. To do this, you need to enclose the relevant words or text parts with small codes, e.g. [i]…[/i] for italics, [u]…[/u] for underlined and [b]…[/b] for bold texts. Further options are [s]strikethrough[/s], [sup]superscript[/sup] and [sub]subscript[/sub]. By using [table], [tr], [th], [td] you can design tables like in HTML. [hr] creates a horizontal line.
To make things easier, votesUP can set up a template for a general type of meeting at the click of a button. Typical voting items such as approval of the agenda, approval of the minutes, etc., will be automatically included. Of course, all items can be modified at any time. The automatic setup is only available if no agenda items have been defined yet.
Each agenda item can be accompanied by one or more downloadable documents. Allowed file types are primarily Office documents (OpenDocument standard and Microsoft Office), PDF and CSV.
Free events can add a total of up to three documents to the agenda, with a maximum file size of 300 KB per document. Paid or partner events can upload up to 50 documents with a maximum size of 5MB each. However, we recommend that you keep file sizes small to ensure the stability of your conference internet.
During the event, each agenda item can be enabled with or without a speaker list, unless you have disabled speaker lists in the event settings.
Every agenda item may be edited, amended or deleted also later on during the event.
⭐️ Pro tip: Items for agenda can be created without publishing them.
This implies they will not appear on the “Agenda” page for participants. Yet, unpublished entries can still be activated to appear in the presentation view and as a banner in each participant's header area. This is useful, for example, for displaying procedural information (such as "Break until 15:30").
It is also possible to create speaker lists based on unpublished agenda items. These can be used, for example, for internal discussions where certain groups of participants are temporarily excluded.
12. Speakers lists and points of order
To use the speakers list feature, an agenda item and must be activated. Easy-to-use functions like the request to speak and procedural motions are available. Points of order can only be raised if the participant is not on the speakers list.
votesUP shows the organisers which participants ask for the floor for the first time in a agenda item. This allows for a priorisation of first-time speakers to be implemented.
By default, the speaker lists do not take into account the gender of participants. The organisers may change that setting, so that votesUP uses gender-aware lists. Depending on the chosen variant, there are options for female, male, non-binary and no information.
In order for the speaking list assignment to work, both the organising team and the participants can specify a gender in their profile. Since assigning a gender to each participant is relatively time-consuming, votesUP supports the organising team: in the participant management section, an automatic gender recognition can be triggered at any time; it tries to assign a gender based on the name of each unassigned participant. If no clear assignment is possible, the respective account will be left as “undefined”.
votesUP displays the current speaking time for each speaker. At the end of their contribution the speaking time is added to the general speaking time for the agenda item. With gendered speaker lists, it becomes apparent which gender had how much speaking time during the event. If you as an organizer assign a gender to the participants, even without a gendered speaker list, a display of speaking time by gender can be generated at the end.
⚠️ If a participant decides to change their attributed gender in the profile, prior speaking times will still not be recalculated.
As an organising team, you can keep a speakers list even if the feature is deactivated for participants. However, the presentation view will still show the list of speakers. You can also close an active speakers list so that the remaining list can be processed, but no one else may take the floor. Via the agenda manager, you can also deactivate the speakers list for the current agenda item completely.
A speaker list is tied to an individual item on the agenda. When switching between agenda items, a new speaker list is used. However, former speaker list will still be available if the previous agenda items are revisited.
If points of order have been raised, a vote can be held by clicking on them. These are automatically created as an open vote.
13. Presentation
The user interface of votesUP is practical for participants and organisers, but it displays too much information for presentation on a screen or shared display. For such cases, a reduction to the essential information is needed. Therefore, votesUP offers a continuous presentation view. This view can be accessed by the organiser as a separate window or browser tab and projected or streamed at a suitable location.
Switch the window to full-screen mode by pressing the [F11] key in most browsers for Windows or Linux, for macOS use [Ctrl] + [Cmd] and [F]. To exit full-screen mode, simply double-click again or press [ENTER] or the [ESC] key.
The presentation screen updates automatically and switches between the following views: ongoing voting, voting results, candidacies, active speaker lists, active agenda item, or general event title.
Alternatively, you can also activate the elements to be displayed manually.
14. Brainstorming rounds
In order to collect ideas or feedback with the participants, there is the possibility of “brainstorming rounds”. All participants (eligible voters, guests and the the organising team) will be allowed to contribute. The contributions are submitted anonymously. The collections will be presented live as a word cloud, as a pinboard cards or alternatively as a list.
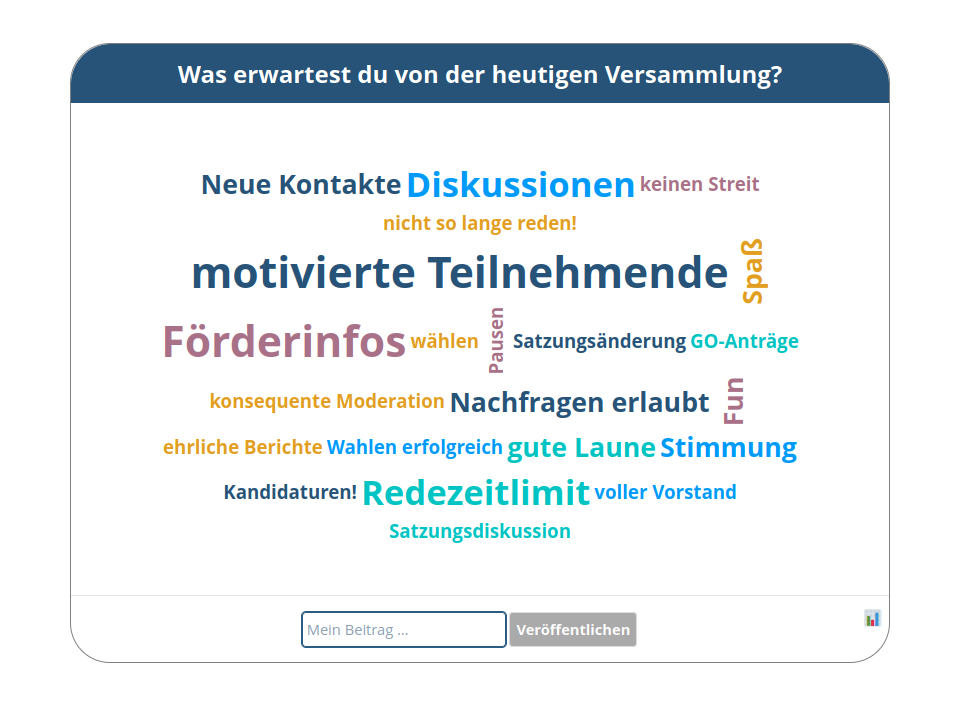
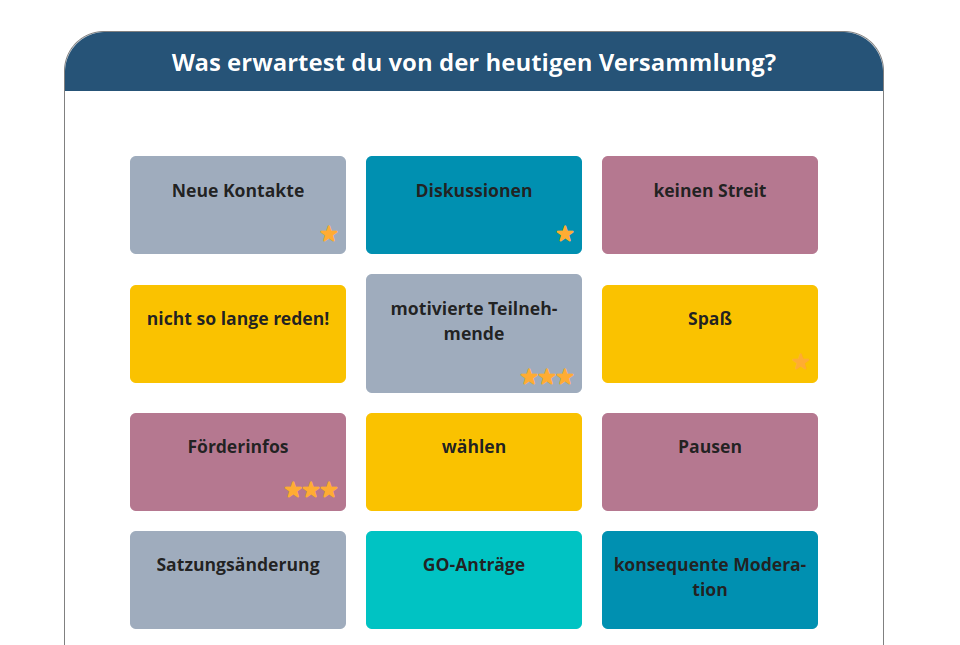
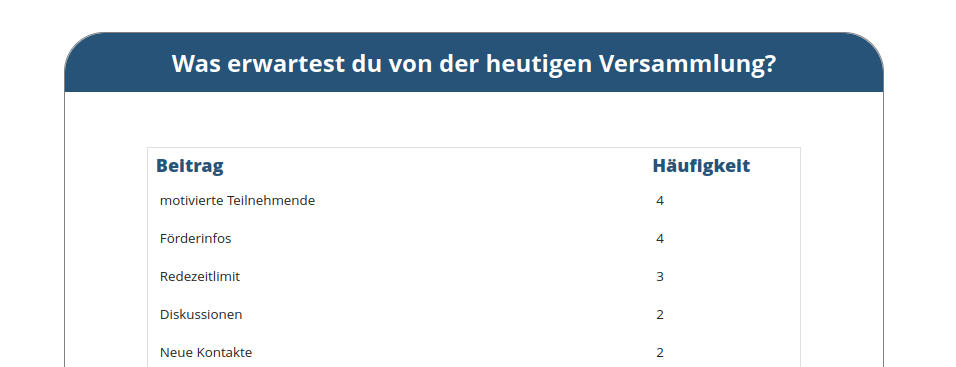
Similar to votings, brainstorming rounds can be prepared with one title/topic each and started or stopped as needed. Only one brainstorming session can be open at a time. During votings, the brainstorming sessions can still be accessed and used.
The contents of completed brainstorming rounds can be viewed again on the results page. Brainstorming sessions can be individually reset or deleted at any time.
15. Focus on the core features: Action Mode
To hide unnecessary features from participants, certain modules such as speaker lists can be disabled in the event settings. The Action Mode takes this a step further, giving participants access to only to what they need to see without being distracted by other options. The menu bar disappears; only the logout button remains available.
This makes the Action Mode is particularly suitable for absentee voting (similar to postal voting, but digital) or when only a few votings or brainstorming sessions are to be held.
For the organising team, all functions remain visible and unchanged.
The Action Mode can be combined with different registration methods. Events in Action Mode can be configured either with very secure access or completely unrestricted, such as passwordless and spontaneous participation. By selecting other than the legally secure mode for one or more voting, so that new eligibile voters can be added to an ongoing poll, a public voting can be implemented.
16. Messages / Chat
The main purpose of the chat is to exchange message and for central messages from the organising team. Participants can currently only send messages to one person at a time, while the organising team can also write to all participants at once. In addition, messages are sent when one's role or status has changed (e.g. recognition/revocation of voting rights).
In the navigation menu, the number of new messages appears next to the chat icon. The indicator is updated every minute.
If you do not want to be contacted by other participants during the event, you can restrict messages to certain groups, such as the organising team. This setting can be found on your personal profile page. If unauthorised participants then try to send a message, they will receive a notice stating that message reception is restricted for that recipient.
17. Profile
On your personal profile page you can check or change various settings: for example, you can review information about your participation role, voting weight, registered email address or access token. You can also change your password there.
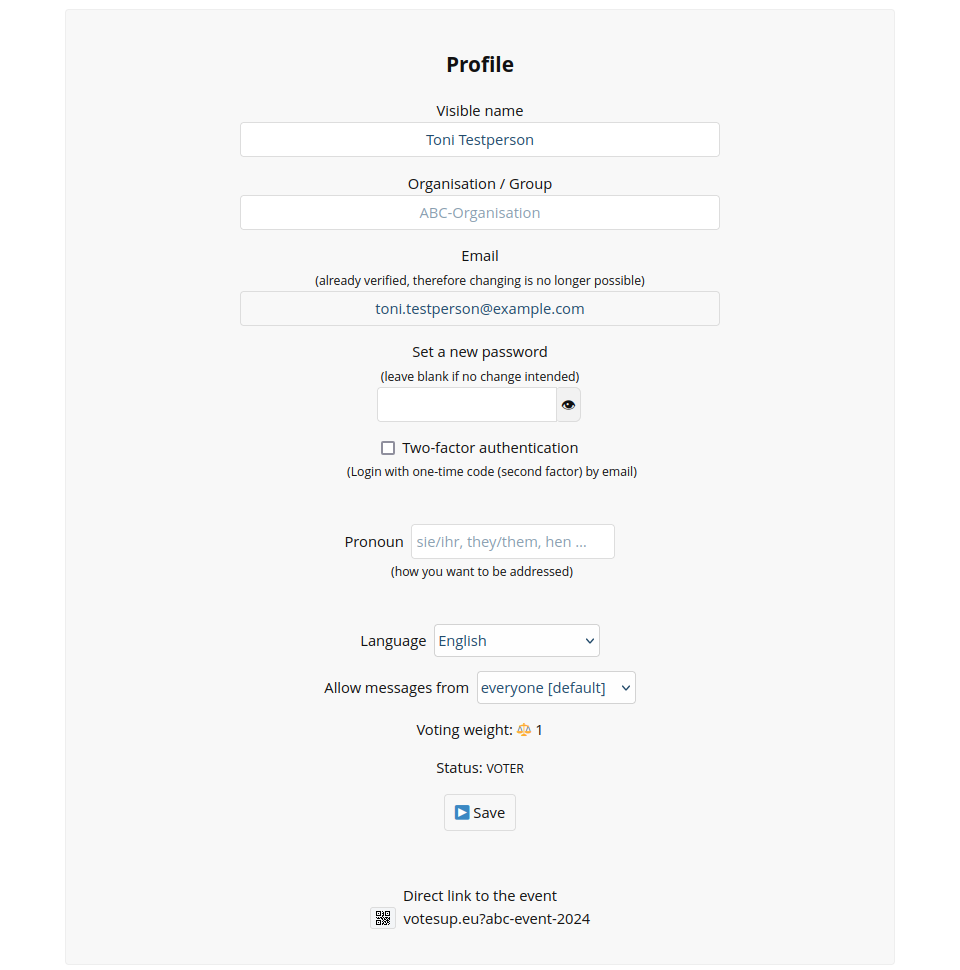
If you want to change the user language, you can currently choose between 29 languages. votesUP is mainly available in European languages. Please note that votesUP does not translate the contents of the event, such as voting questions or agenda items, but only the user interface.
The personal display name can be adjusted if the automatic recognition by votesUP was not sufficient. Typos in the email address can also be corrected and a confirmation email (if necessary) can be triggered. If an email address had already been confirmed, it cannot be changed for this account anymore. The organisers can decide whether the display names of the participants are set and unchangeable at some point.
Depending on the setting of the event, participants can specify their sex/gender. This information is evaluated whenever the quorum is checked, and it is visible in the speakers lists.
Besides gender, participants can also specify how they would like to be addressed. Common examples for preferred pronouns are “he/him”, “she/her”, “they/them” or the Swedish gender-neutral “hen”. Providing your pronoun is optional. It will be displayed in the participant and speakers lists.
To further secure an account that is based on an email address, you can activate two-factor authentication (2FA) here. Then votesUP will send you an email with a new 6-digit access code (TAN) every time you try to log in. Those access codes expire automatically after use or after thirty minutes.
18. General settings
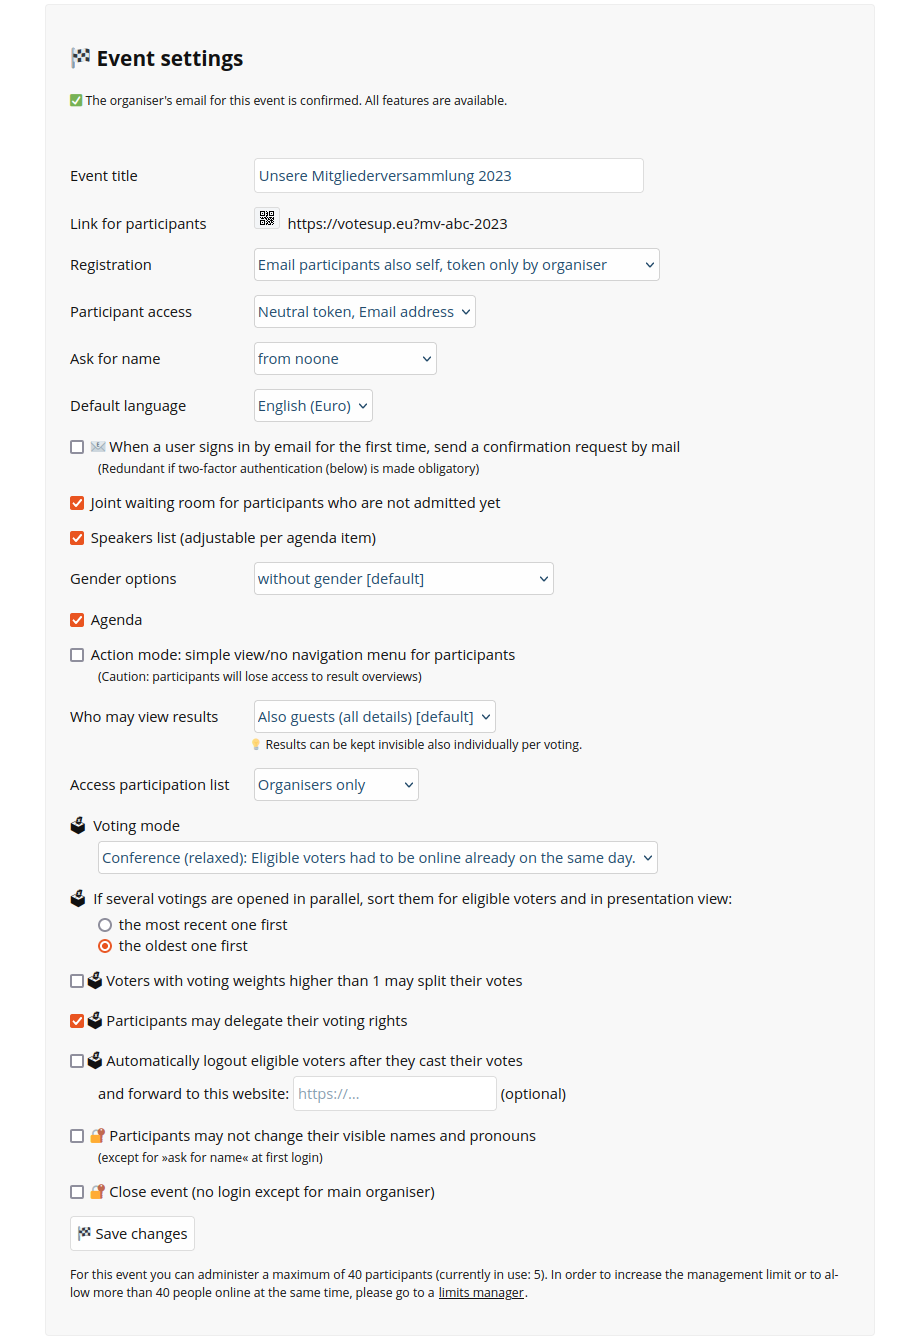
The default language for an event can be set in the event settings. New attendees will see the interface in this language. A personal preference can override the default setting.
19. Legal information and privacy policy
Each event may have its own legal information and privacy policy. These policies will be visible to logged-in users on the Legal and Privacy pages of votesUP.
Members of the organising team can edit the policies directly on the respective pages. If links are inserted, they will be detected and automatically converted into clickable hyperlinks. If you want to emphasise parts of the text, you can make them italic, underlined or bold.
20. Data Processing Contract
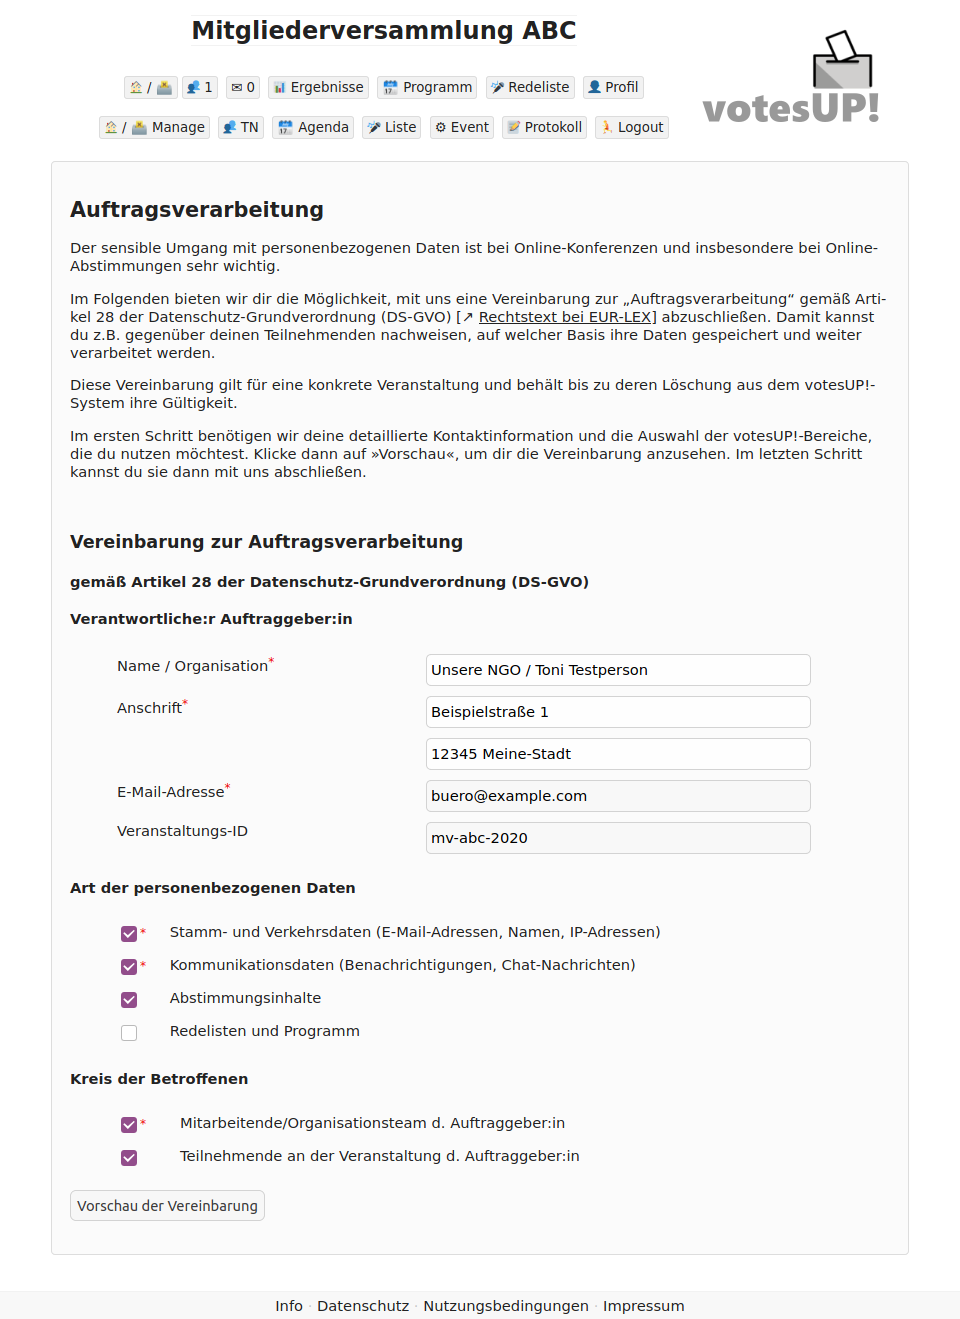
votesUP offers to generate a “Data Processing Agreement” (DPA) in accordance with article 28 of the General Data Protection Regulation (GDPR) [↗ Legal text at EUR-LEX]. This allows you to clarify, e.g. towards your participants, on what basis their data is stored and processed. This agreement is valid for one specific event and remains valid until it is removed from the votesUP systems. In order to prepare the agreement, votesUP will ask for your detailed contact information and the votesUP features which you want to use.
21. Close, reset or delete an event
At the end of an event, it may be useful to prevent attendees from changing their display names afterwards. The event can also be "closed" so that no access is possible except for organisational users. This closure can also be reversed at any time, meaning that the event can be re-opened again.

After 90 days of inactivity, the event will be automatically deleted from votesUP. Earlier deletion can be initiated by the organiser accounts at any time. A partial reset is also possible, e.g. after test runs.
- The following options are available to reset or delete an event:
- Reset email invitations: Sometimes you need to remind participants how to join the event. Reset the invitation status to enable another round of personalised emails.
- Delete results only: After test runs, you can clear the voting results so that the ballots are available as fresh templates again.
- Delete all votings: Not only the voting results are deleted, but also the ballot papers will no longer be available as templates. Likewise, all brainstorming sessions will be removed.
- Delete votings, minutes and participants: Apart from the main organiser account, all participants, the minutes and the speaker lists will be deleted.
- Delete entire event: Delete everything. You will be logged out immediately, but you will still receive an e-mail confirmation of the successful deletion (if the main organiser's e-mail address has been confirmed).
⚠️ For confidentiality reasons, any tokens that have already been used are not reset when you clear the votings However, used tokens can be deleted and new tokens can be created as replacements.

22. Long-term archiving of results
Inactive events are deleted after 90 days. To archive votings and other results in the long term, you need to export all data from the system. votesUP offers the following three variants, which can also be used independently from each other:
- Automatic minute-keeping of the event
votesUP automatically keeps a record of the event. This log can be exported via copy & paste and transferred to a word processor or alternatively printed directly from votesUP. In their «Print» dialogue most operating systems also offer the option to create a PDF instead. - Overview of voting results by email
votesUP can send all voting results arranged chronologically in an email to the organisers. This function can be found on the «Results» page. Only members of the organising team can see that button, but it is not available for regular participants.
Emails from votesUP are always transport-encrypted, i.e. only votesUP and the receiving server can access the email. - Archiving the digital ballot box
For secret ballots, votesUP provides the digital equivalent of a ballot box: all ballot papers cast can be viewed and, if necessary, printed out as a long document or saved as a PDF. The order of the ballot papers in the display is decoupled from the actual order in which the votes were cast. This further secures the secrecy of the election.
23. Large events
With up to 40 participants (partner events: 80) it is possible to host an event spontaneously and for free: after you have created your event, you only have to confirm the organiser's email address and then you are good to go! We will try our best to keep such smaller events free of charge also in the future.
But also events with 1,000 or more participants are no problem with votesUP. For digital absentee ballots, votesUP is currently open to up to 30,000 participants. Yet you will need some preparation time for the event.
If you expect more than 40 simultaneous participants at your event, or you need more places than provided by the default limit, you will need to request an increase in the votesUP system. To be on the safe side, you should not submit increase requests last minute, but ideally four or more days before the intended start of the event. Limit increases can requested up to six months in advance.
First you need to create an event and confirm the main organiser's e-mail address. Once you have confirmed the address, you will find an option for limit increase requests in your event: The easy-to-use form can be accessed via the participants manager and also via the event settings.
votesUP will ask you about the required places for participants and the foreseen start and end dates of the event. The data is needed for votesUP in order to be able to schedule expected server loads.
For events within partner agreements, the administrative limit may already include more than 40 participants. A date announcement is also only necessary for live events with more than 80 participants (so that the necessary resources can be allocated). Among other things, this makes it possible to check how many parallel events have been announced. However, the increased standard limit for partner profiles already has advantages even without a date announcement: Larger events can be prepared with more flexibility and “digital absentee votings“ can be carried out without further arrangements.
Fees: Every event is different. Sometimes it takes a few test votings, sometimes the participants are already very experienced. Sometimes only a few votings/elections are to be held, sometimes votesUP is needed continuously and over several days at a conference. It is important to us that organisers will never have to refrain from holding additionals rounds of voting only because of financial considerations. The democratic process should be the focus of your event, not the question of money! Due to the wide range of usage needs, we do not have fixed prices. Instead, we ask you to submit an offer within the framework of our orientation guide and on the basis of your self-assessment. The orientation guideline suggests 50ct - 1 € per participant seat/day for live settings (only 40ct for live events lasting less than three hours). When using votesUP for “digital absentee voting”, the framework naturally does not apply per day, but for the entire duration. A maximum flat rate of 25ct per participant place is applied here. Further information can be found on our price list.
You will also find an input field for the billing address and one for any other comments. However, we recommend not to mix other questions with the increase request; rather send us a separate e-mail for those issues. You will receive a notification once your limit increase has been activated – or an e-mail with questions/information in case we have encountered any issues for clarification. If there are no other issues, the limit activation may sometimes take place within only a few minutes. The invoice will be sent after your announced event period ends, unless otherwise agreed.
All participants can already be fully managed from the time of activation of the limit increase – you do not have to wait until the announced start of the event. Test runs with up to 40 participants are possible at any time. In this context, it is helpful to know that you as the organiser may also reset the votings so you can start again with a fresh event later on.
Please note: All team members of votesUP have other main jobs. Therefore, it sometimes may take a bit longer until your request will be taken care of.
24. What can go wrong? (or: frequently asked questions)
📧 I have created an event, but misspelled the email address!
If you did not receive the verification email, you can still save the event from automatic deletion after three days: Log in as an organiser, go to “Profile” in the top right menu bar and correct your email address. Then click on «Request confirmation link» in your profile.
Alternatively, you can delete the event that you have just created and set up a new one with the same event ID.
📧 A participant made a typing error during log-on and registered a second time!
The easiest way is to set this second account to “blocked” by the organisers. This will automatically log the wrong participant out. Then ask the person concerned to log in again with the correct address. Alternatively, the original account can be blocked and/or deleted.
Bear in mind that deletion of an account is only possible as long as the participant was not eligible to partake in a voting.
Unconfirmed email addresses can be changed by the organisers. However, an email address may not appear twice in an event, even if one of those accounts is currently blocked.
📧 The verification link in a confirmation email has expired!
No problem, you still have two options to confirm your account:
1) votesUP also sends an email via the «Forgotten password?» function, which implicitly confirms your access to the mail account and thus your “authenticity”.
2) You can request a new confirmation link emailed to you via your «Profile» within the event, in case you are already online.
⚙️ Some buttons seem to be missing!?
If you have an ad blocker enabled in your browser, it may inadvertently hide elements that you want to see. This occurs, for example, with “uBlock Origin” when the “Annoyances” section is switched on.
votesUP does not come with advertising or trackers, so we recommend deactivating the ad blocker while you are using votesUP.
⚙️ In my event, only 40 participants can sign in at the same time, although we thought to have a higher participation limit?
Events with more than 40 participants need to be registered with a specific time period via the event settings. Outside that period, you can manage/edit all participants or do test votings, but no more than 40 people may be online at the same time.
If your event is to have more than 40 participants at the same time on several, non-contiguous dates, you need to enter the separate dates via the limit increase in each case.
⚙️ I would like to host an event and nonetheless take part in votings. Is that possible?
An organiser account is not allowed to take part in votings. votesUP is built that way so that participants can be sure that the organising team will be less prone to cheating.
You therefore need a separate registration to vote. If you want to register as a participant in addition to your organiser account, you will have to open a different browser or a “private window” and log in with a different email address or token.
⚙️ I have given voting rights to one person for testing purposes, but they should now switch over to the Organiser Team!
As soon as someone has been eligible for a concrete voting, their account may no longer be changed into an organising team member. Thanks to that barrier in votesUP, other participants can be sure that no cheating is going on behind their backs. However, if you reset the event and delete all voting results, then a change of role from Voter → Guest → Orga is possible again.
🔒 My code for the Two-Factor-Authentication has expired!
You have two options here: Either click on «Logout» and then sign in again. You will then receive a new authentication code by email. Alternatively, you can ask the organers of your event to temporarily or permanently disable two-factor authentication for your account.
🔒 I am not able to log in despite using correct credentials, but always end up back on the start page!
If you do not receive any other error message, the cause is probably the automatic detection of misuse: This can be caused by yourself or by others, e.g. when you go online via a shared Wifi or the TOR network. Your computer could also be infected by malware and cause abusive actions on the internet without your knowledge. However, votesUP also assesses very old browser as abuse attempt: If a browser has not been updated for five years, it is no longer fit for today's internet. If you believe that you have been unjustifiably excluded, please contact our support directly.
🗳 I have assigned voting rights to a person, but votesUP still does not allow them to cast their vote!
If you assign voting rights during an ongoing vote, in votesUP's default mode these only apply to any next voting that follows. If the group of eligible voters changed during a voting, a legally compliant execution in the strict sense could not be guaranteed.
If the newly added voting rights should also be valid for an ongoing vote, you can change the mode in the respective voting under “Eligible voters”: Confirm there that the votesUP also allows new voters on an ongoing basis. However, it is not possible to switch back to the strict mode.
🗳 Why does it take several seconds until a new voting appears on the device of a participant?
votesUP is designed to consume as little bandwidth as possible and thus to function well even in large Wifis with many participants. We recommend that your event host announces “We are now proceeding to the vote, click on the voting box”. Your participants do not have to wait patiently for the ballot paper or the result to be displayed – the slightly delayed, automatic display update is intended for less active participants so that they can still take part in the event.
🗳 The voting result does not seem to fit: There were more ballots submitted than votes counted!
This situation can occur if you had specified that blank ballots may also be submitted.
🗳 The voting result does not seem to fit: There are more individual votes than total ballots cast!
If you have specified in the ballot definition that more than one candidates can be selected, the total votes may naturally be higher than the number of persons voting.
👩💻 Why do participants sometimes get kicked out and have to log in again?
In principle, votesUP keeps the connection with logged-in users alive. However, there are three reasons why automatic logouts may occur:
1) A “I'm still here”-ping is exchanged between users devices and votesUP every few seconds. Only when votesUP has not received such ping from a device for 15 minutes the affected session is removed and the user is logged out. Mobile devices in particular try very actively to save power and therefore quickly put unused windows to sleep. On the desktop, that can also happen with background tabs in the browser. Therefore, it is possible that the user's device simply disconnects and votesUP assumes that it is offline.
2) When retrieving uploaded documents (Office or PDF documents), the browser may open them directly in the active window instead of in a separate process. As a result, the end device loses the connection to votesUP and is logged out accordingly. It is therefore advisable to open documents in a new tab on affected end devices. On PCs this can be done with a right mouse click, on touchscreens with a long tap.
3) In rare cases, we have to apply individual updates to the votesUP server during day-time. Those could cause users to lose the connection for a short moment and be logged out, depending on where they were currently active in the system.
📺 While in a video conference, some other person has shared their screen – how do I switch to votesUP?
Some videoconferencing systems automatically occupy the full screen space. In this case, participants need to find the function to exit full screen mode. It may be a good approach to place the votesUP application window on one side of the screen and, if necessary, even resize the browser window to make it bit narrower.
👨👩👧👧 I would like to conduct votings with children or teenager under the GDPR age limit
The GDPR identifies an age limit of 13-16 years, set individually by the EU member states, under which a more sensitive approach to data processing is required.
The GDPR is very clear on this: In order to process personal data of children and adolescents, the consent of their legal guardians is required. In some cases, anonymous access via tokens may help with issues related to privacy, but they also depend on other factors, such as the topics being voted on.
⚙️ Special characters look weird in a CSV export!
Unfortunately, some commercial office products are set to the character encoding “Western (Windows-1252)” by default. This means that names of participants with special characters from Central and Eastern Europe, Turkey, or other countries would not be possible. Therefore, votesUP uses the modern “Unicode/UTF-8” encoding. Modern office programs like LibreOffice are set up for multilingual use by default, and you can easily open the file by double-clicking it. With other products (e.g., MS Excel), you may need to go through the “Text Import Wizard” to select UTF-8.
⁉️ I have lost track of my events. Is there anywhere to get an overview?
votesUP can email you an overview of all events in which you are registered either as an organiser or regular participant with an email address. Request your overview.
